Make Your Own Spanish Guitar - online book
Complete plans & Instruction on how make your own Spanish Guitar.
| Share page | Visit Us On FB |
|
Making the Guitar |
|||
|
|
|||
|
FIRST STEPS
The first consideration is the body size of the guitar to be made. Although the guitar is today more-or-less "standard" in body size, different luthiers vary their measure�ments slightly. In this book the Clifford Essex " concert size " guitar (pictured on the preceding page) is used as a model.
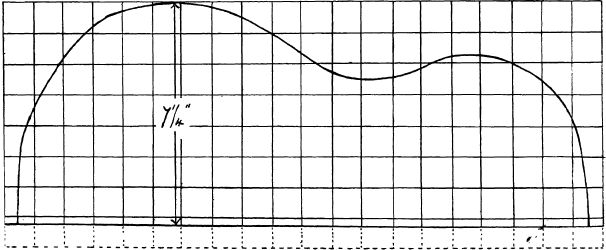
Fig. 1 gives the body shape in template form and this should be copied on to a large sheet of fairly stout cardboard. As this template is called into use several times, it might be advisable to copy the shape on to a thin sheet of zinc or aluminium�or even a sheet of plastic. It will then be easier to transfer the shape to the actual woods to be used later.
Each square shown in Fig. 1 represents one inch.
On the large sheet of cardboard (metal or plastic) rule off one-inch squares to cover an area twenty inches long by eight inches wide.
As both halves of the guitar are identical, only one half is shown.
The actual body of the guitar is con�structed inside a mould (see Fig. 2) and as this is probably the most important part of the luthier's (and amateur guitar maker's) equipment, full details for making this mould are given. |
The mould can be constructed from solid timber but for the amateur it might be found more convenient to build it from six lamina�tions of 1/2" wood or three laminations of 1" timber. If this is done, " cross" the grains to give added strength to the mould.
Ordinary deal can be used provided it is well-seasoned.
Reference to Fig. 2 will show that the mould is made in two halves to make it easy to remove the various parts of the guitar body at the appropriate times.
When cutting out the inside shape of the mould, for which the guitar body template is used as a marking medium, cut the mould a fraction of an inch smaller in size so that the mould can then be cleaned up with the scraper and then glasspapered to the exact size required.
Accuracy in making the mould is most important, for on this piece of equipment de�pends the completed shape of the finished guitar. Great care should be taken to ensure that the " walls " of the mould are at perfect right-angles to the flat surfaces and that the top and bottom joins are perfect.
When an amateur makes a mould it some�times happens that a little too much wood will be taken off in one place. This is not as serious as it may appear for such a mis- |
||
|
|
|||
 |
|||
|
|
|||
|
Fig. 1.�The template for marking out the body shape. Each square represents V |
|||
|
|
|||